
Establishing a Physical Posture for Meditation
by Eric Van Horn
Copyright © 2015 Eric K. Van Horn
for free distribution
You may copy, reformat, reprint, republish, and redistribute this work in any medium whatsoever without the author’s permission, provided that: (1) such copies, etc. are made available free of any charge; (2) any translations of this work state that they are derived herefrom; (3) any derivations of this work state that they are derived and differ herefrom; and (4) you include the full text of this license in any copies, translations or derivations of this work. Otherwise, all rights reserved.
Table of Contents
Introduction
Here a [meditator], gone to the forest or to the root of a tree or to an empty hut, sits down; having folded his legs crosswise, set his body erect, and established mindfulness in front of him... - [MN 118.17]
It is amazing to me how many long-term meditators still find it difficult to sit comfortably for any length of time. I once went to a retreat at the Bhavana Society where after a few days it was such a problem that one of the senior lay people there offered a workshop on how to sit, and everyone at that retreat had a great deal of experience.
Some meditation teachers will tell you to just somehow grit your teeth and live with whatever pain arises. There will come a time when dealing with physical discomfort will be part of the practice. However, in the beginning it is very important to establish a comfortable sitting posture. In the Tibetan tradition they call this "finding a seat".
There is really only one aim for your physical posture and that is to find a sitting position where you can put the body and leave it there relatively comfortably for the duration of the sitting. If your sitting posture accomplishes that goal, you have found your seat.
However, do not be surprised if it takes some time, effort and experimentation to find your seat. You may also find that as you age you need to accommodate changes in your body. As with all things in your meditation practice, it requires both patience and persistence to find a rock solid sitting posture.
Establishing a comfortable, stable sitting posture is the first skill that you must master to meditate.
I am going to relegate the instructions on posture to three positions. These do not include any of the lotus positions (full, half and quarter). They are wonderful postures if you can do them. However my guess is that if you can do them you do not need an explanation. This section might be called "postures for the rest of us".
The Burmese Position
The first posture is sometimes called "the Burmese position". It is a very stable three-point posture that people throughout Asia use, and is accessible for most people. I have very bad joints and curvature of the spine, and I find this is my most stable position and my preferred posture.
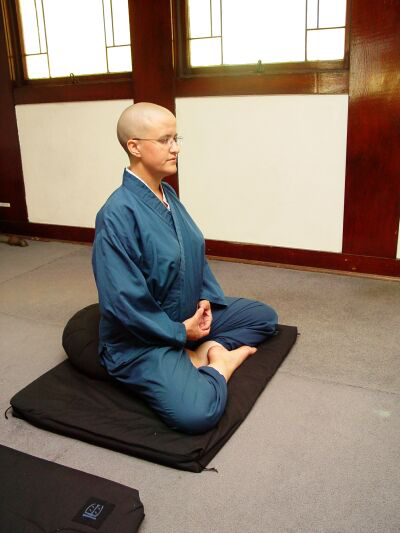 Figure:
The Burmese sitting posture
Figure:
The Burmese sitting postureThis illustration shows someone on a zafu, which is the traditional meditation cushion, and a zabuton, which is the pad underneath. However, you do not need special cushions for meditation. When I first started I was broke, and I used pillows, blankets and towels. (The Buddha sat on piles of buffalo grass.)
As you can see the knees and feet are on the floor. In all of the postures the hips are tilted forward and the back straight. The head should balance on top of the spine, otherwise the shoulders will strain.
Whenever you sit down to meditate - no matter what position you are using - the same principles apply: head, hips and hands. The head is balanced on top of the spine. You may find it helpful to sway back and forth and side-to-side to find the right balance point. The head is quite heavy. The hips must tilt forward slightly and open. The hands must not pull the shoulders forward.
The biggest problem with this posture is limited flexibility in the hips. You may feel the strain in the feet or the knees, but the problem is usually in the hips. You may also find that after a longer sitting that the lower back and/or the upper back (shoulders) are strained. It is very helpful to know a few stretches to relieve discomfort in these areas. I have a stretching routine that I got from Bob Anderson’s book "Stretching".
In order to keep a good, vertical position and the head balanced, you may find that you have to lean back a bit further than at first feels comfortable. Some people even feel as if they are going to fall over backwards. You will have to experiment, but do not be afraid to try leaning back.
Another thing that can help in the beginning is when you first sit down, stretch your entire upper body forward and then lean back into a vertical position. Then check that the head balances on top of the spine.
The other issue is the hands. The hands as shown in the photograph are in the preferred position. Some people put their hands on their legs or knees, but this tends to pull the shoulders forward, and this creates a lot of strain in the upper back. In order to get your hands at the proper height, you may need to fold your clothing in a way that supports the hands. I have shorter than normal arms, so I have to make this adjustment. You can also put a small support cushion on your lap to support the hands.
Finally, the dominant hand goes on the bottom, so if you are left-handed, put the left hand on the bottom holding the right hand. If you are right-handed, put the right hand on the bottom holding the left hand.
So the abbreviated summary of bodily posture is this: hips tilted forward, back straight, head balanced on top of the spine, and the hands comfortably on the lap, making sure that they are not pulling the shoulders forward.
The Seiza Position
"Seiza" is the Japanese word for "sitting". In Japan people sit in this position. Unlike Westerners they do not use cushions or benches. They simply sit on their folded legs. However, as we are not used to it, we usually use a cushion under the buttocks, or a seiza bench:
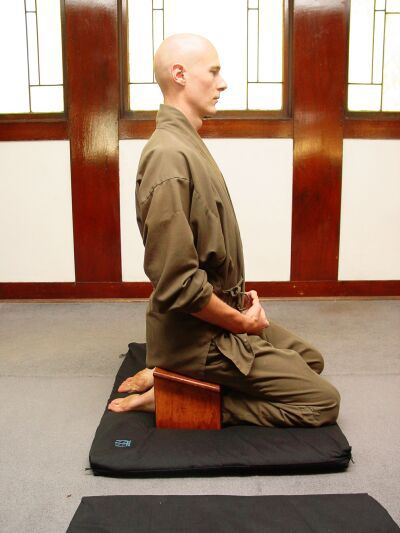 Figure:
The Seiza Position
Figure:
The Seiza PositionThe instructions for the head, hips and hands are the same as for the Burmese position.
One thing to keep in mind is that - apropos of different heights and body proportions - you have to find the proper spot on the bench to sit comfortably. I am short, and have found that I need to consciously sit on the front of the bench, otherwise my back and hips are not in the correct position. Someone who is tall will probably need to sit more toward the back of the bench.
There are many different types of seiza benches, but my experience is that the traditional one works the best. However, do not be afraid to experiment. What works best for me may not work best for you. I also often use a cushion instead of a bench in the seiza position. To do this just put the cushion between your knees. (If the cushion is a zafu you can turn it on its side.) If you are sitting in a Burmese position, it is easy to switch to a seiza position using the cushion. When you are sitting for a long time - like when you are on retreat - switching back and forth between the Burmese position and the seiza position can make sitting a little more comfortable.
Sitting in a Chair
Most people think that this will be the easiest position, but that has not been my experience. I find it very difficult – with one exception that I will describe – to sit comfortably for any length of time in a chaiṛ.
If, however, you do sit in a chair, you want to start by checking the leg position. Chairs are all the same height, but people are not. Taller people will find their knees above the hips, and shorter people will find the front of the chair cutting into their upper legs. The idea is to get the upper leg sloping slightly downwards about 10-degrees from the horizontal. Taller people may need to put cushions under the buttocks; shorter people will need to put cushions (or towels or blankets) under their feet.
Sit on the forward part of the chair, not leaning back, with the head, hips and hands in the same position as described for the Burmese position. I find the hardest part is keeping the hips cocked forward and the back straight. A cushion may help to keep the hips leaning forward properly.
The one exception I find to the chair-being-problematic is the "tilt seat eco chair" made by Carolina Designs. I tried many of the so-called ergonomic chairs without any success, but this one works well for me:
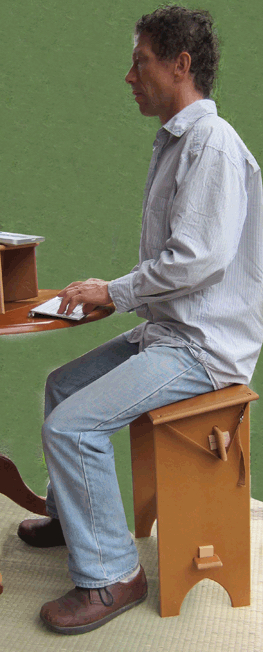 Figure: The Tilt Seat
A few years ago I had a knee injury and could not sit on the floor, so I bought one of these. I also bought a cushion for it, which is a separate item.
However, I realize that not everyone will want to buy a special chair. Be assured that by using towels and pillows and whatever you have available, you can make a chair work. Stick to the principles of head, hips and hands and maintaining a right angle at the knees.
How Long to Meditate
It takes a while to establish a stable and comfortable position. Just like running a marathon, do not over-do it in the beginning. Find a length of time that works for you. I started with 5 minutes, which seemed like an eternity. Work your way up slowly. You may add a minute a day, or 5 minutes a week. Do whatever makes you feel comfortable, and then sit just a while longer.
The standard sitting times are 45 minutes or an hour. However, I find that as little as 10 minutes is enough to establish a calmer, more settled state of mind. 20 is better. You will have to find some time – hopefully between 20 minutes and an hour – that works for you and fits into your daily schedule. However, as I said, in the beginning start with what you can do – perhaps 5 minutes – and work your way up.
We will also be doing a practice shortly called "sweeping" that is helpful in establishing a comfortable posture.
You can use any convenient timer. It is good to use a timer and not a watch. If you are using a watch you have to keep looking at it, which is a distraction. For a long time I just used a kitchen timer. Then I switched to a "GymBoss timer". Now I use an iPad application. But anything that keeps you from having to look at a watch is fine.
There is one last thing. Despite what I said about being comfortable, one of the things we are trying to learn is how to work with discomfort. We want to make it workable. No matter how much we may want life to be a certain way, it has a habit of being just the way it is. This includes mental and physical discomfort. In meditation, we are not trying to make those go away. They won’t anyway, so there is no point to it. We are trying to not make the discomfort into a problem. Thus, if when you are sitting you feel a little discomfort, do not quickly respond by shuffling or changing position. Sit with it a little and see what happens. See if it goes away. See if it changes. Get to know it. That is "making it workable".
I have a three strikes and you are out rule. The first time I feel something unpleasant, I just sit with it and see what happens. It will usually go away. Then I do this a second time. By the third time I feel it I will usually change position, slowly and mindfully.
There will come a time when the discomfort fades into the background. I heard a story once about a young man who entered a Zen monastery in Japan. He really had trouble with sitting, and in Zen monasteries they are very strict about not moving during a sitting. He had a lot of pain. Finally he gave up and decided to quit the monastery. When he was having his exit interview with the abbot, he asked, "If I were to stay here another 6 months, would the pain go away?" "No," replied the abbot, "But you wouldn't care any more".
The way I am going to teach meditation will - I hope - not cause you this kind of pain. The moral of the story is that at some point your concentration will be such that any discomfort you feel will not matter any more. This is a great lesson in the power of the mind and the practice.
Summary
There is a lengthy discussion here of how to do something that we do every day. But this is an example of how little we know about our bodies. You have already learned a great deal that most people do not. Getting to know the body is one of the most important aspects of meditation practice. It is so important that the "Kāyagatāsati Sutta: Mindfulness of the Body" [MN 119] describes an entire path to final liberation using only the body as the object of meditation.
- The goal of your sitting posture is to find a position where you can put the body and leave it there relatively comfortably for the duration of the sitting
- Regardless of the position, the same principles apply: head, hips and hands. The head balances on top of the spine. The hips tilt forward and are open. The hands must not pull the shoulders forward.
- If you are sitting on a chair, make sure that the knees are at a right angle.
- Use a timer and not a watch so you can meditate without being distracted.
